Appium: Important Concepts
What is Appium?
Appium is an open-source automation tool that simplifies testing mobile applications on different platforms like iOS and Android. It has gained widespread adoption in the software testing community since its release in 2012 and has been around for several years. Over time, Appium has evolved with regular updates and enhancements to support the latest mobile application development technologies and practices.
Why is Appium important?
The rich feature set of Appium, its platform compatibility, openness, and community support make it an essential tool for mobile testing, helping teams ensure the quality and reliability of their mobile applications.
How does this tool work?
Appium operates through a client-server architecture, where the Appium server acts as a bridge between the testing code (client) and the mobile device or emulator (device). Therefore, Appium connects your device or emulator with your code, typically achieved through terminal command lines and connecting your physical device with a USB cable. Every action in the code translates to an interaction on the device - for instance, to perform a swipe gesture, you write code and apply it to your device using Appium.
The Essentials of Mobile Element Inspection
Prerequisites
- Ensure Java and Android Studio are installed
- Node.js and NPM should be set up on your system

How To install Appium V2
- Install Appium globally using the command `npm install -g appium`
- Validate the installation with `appium -version`, which should return "2.5.1"

How to Set Up Appium Drivers
**Identify Available Drivers:**
**Command:** `appium driver list`
**Result:**
uiautomator2 [not installed] - For Android
xcuitest [not installed] - For iOS
mac2 [not installed]
espresso [not installed] - For Android
safari [not installed] - For Safari Browser
gecko [not installed] - For Firefox Browser
chromium [not installed] - For Chrome Browser
**Install the UIAutomator2 Driver:**
**Command:** `appium driver install uiautomator2`
**Result:** Successfully installed 'uiautomator2' using NPM install spec 'appium-uiautomator2-driver'
automation Name: UiAutomator2
platformNames: ["Android"]
**Available Appium Plugins:**
**List Plugins:**
**Command:** `appium plugin list`
**Result:**
images [not installed]
execute-driver [not installed]
relaxed-caps [not installed]
universal-xml [not installed]
**Install the Images Plugin:**
**Command:** `appium plugin install images`
Note: The default home directory for Appium is `.appium`. It can be changed by setting the `APPIUM_HOME` variable, for example:
APPIUM_HOME=/path/to/home appium driver install
How to Launch the Appium Server

Start the server via `appium server -p 4723 -a localhost -pa /`, specifying the desired port, host, and path.
Command to Start Server: appium server -p 4723 -a localhost -pa /some text
- -p: Port number. Default is 4723. It is recommended to use localhost.
- -a: Remote host IP. Default is 127.0.0.1.
- -pa: Remote path. Default is /.
Note: If the server parameters are not declared, Appium will initialize with the default values (host: 127.0.0.1, port: 4723, and path: /). However, explicitly defining these parameters is encouraged for clarity and specificity. Additionally, if parameters are not specified, you can use either ‘appium’ or ‘appium server.’ This structure provides clear and concise information, making it easy for readers to understand and follow the instructions when setting up their Appium server.

Resolving Issues: Emulator or Device Setup
- Resolve emulator issues by setting an alias in `~/.bashrc`: `alias emu="$ANDROID_HOME/tools/emulator"`.
- Launch the emulator with `emu -avd <name>` or connect an Android device with USB debugging enabled.
Note: Due to a current emulator issue, the emulator can’t launch avds, to work around it until it's fixed, create an alias to the emulator at ~/.bashrc by following those steps:
alias emu="$ANDROID_HOME/tools/emulator"
So, use 'emu' instead of 'emulator':
emulator -avd <android emulator name>
OR
emulator @<android emulator name>
emulator -avd Pixel_3a_API_34_extension_level_7_x86_64
OR
emulator @Pixel_3a_API_34_extension_level_7_x86_64
emu -avd <android emulator name>
OR
emu @<android emulator name>
emu -avd Pixel_3a_API_34_extension_level_7_x86_64
OR
emu @Pixel_3a_API_34_extension_level_7_x86_64
Connect your Android phone to USB or open an Android Emulator, and enable the Debug Mode:
Settings > System > About > Click 7 times into Build Number to enable Developer Mode
Turn ON the USB Debugging:
Settings > About Device > Click at Android Build Number > Developer Options > USB Debugging > Turn ON Debug Mode
OR
Settings > System > Developer Options > USB Debugging > Turn ON Debug Mode
And verify if the device or emulator is visible to the system (this is also the udid device value of your device):
adb devices
emulator-5554 device
It`s possible to install your .apk into device/emulator or drag-in-drop into emulator
adb install path/to/file.apk
The Basics of Appium Inspector
How to configure the Appium Inspector

- Download and launch Appium Inspector from its official release site https://github.com/appium/appium-inspector/releases, and open it:
chmod +x Appium-Inspector-linux-2024.6.1.AppImage
./Appium-Inspector-linux-2024.6.1.AppImage
- Set it up to connect to your Appium server, defining your testing environment by setting up the current Appium server information:
- Remote Host: localhost (127.0.0.1 default)
- Remote Port: 4723 (default)
- Remote Path: / (default)
- Fill in the desired capabilities to identify the device or emulator:
- deviceName or udid or avd — to identify the device (One at least)
- platformName -to identify the device platform
- platformVersion -to identify the device platform version (Optional)
- app — to install the application .apk (Optional)
- appPackage and appActivity — to identify the installed app and activity
- automationName — to identify the driver (UIAutomator2, xcuitest, … )
- noReset — to restricts the running application from clearing or stopping the application data (Optional)
- isHeadless — to enable or disable headless (Optional)
- newCommandTimeout — time to execute next command (Optional)
4. Find out the activity and package
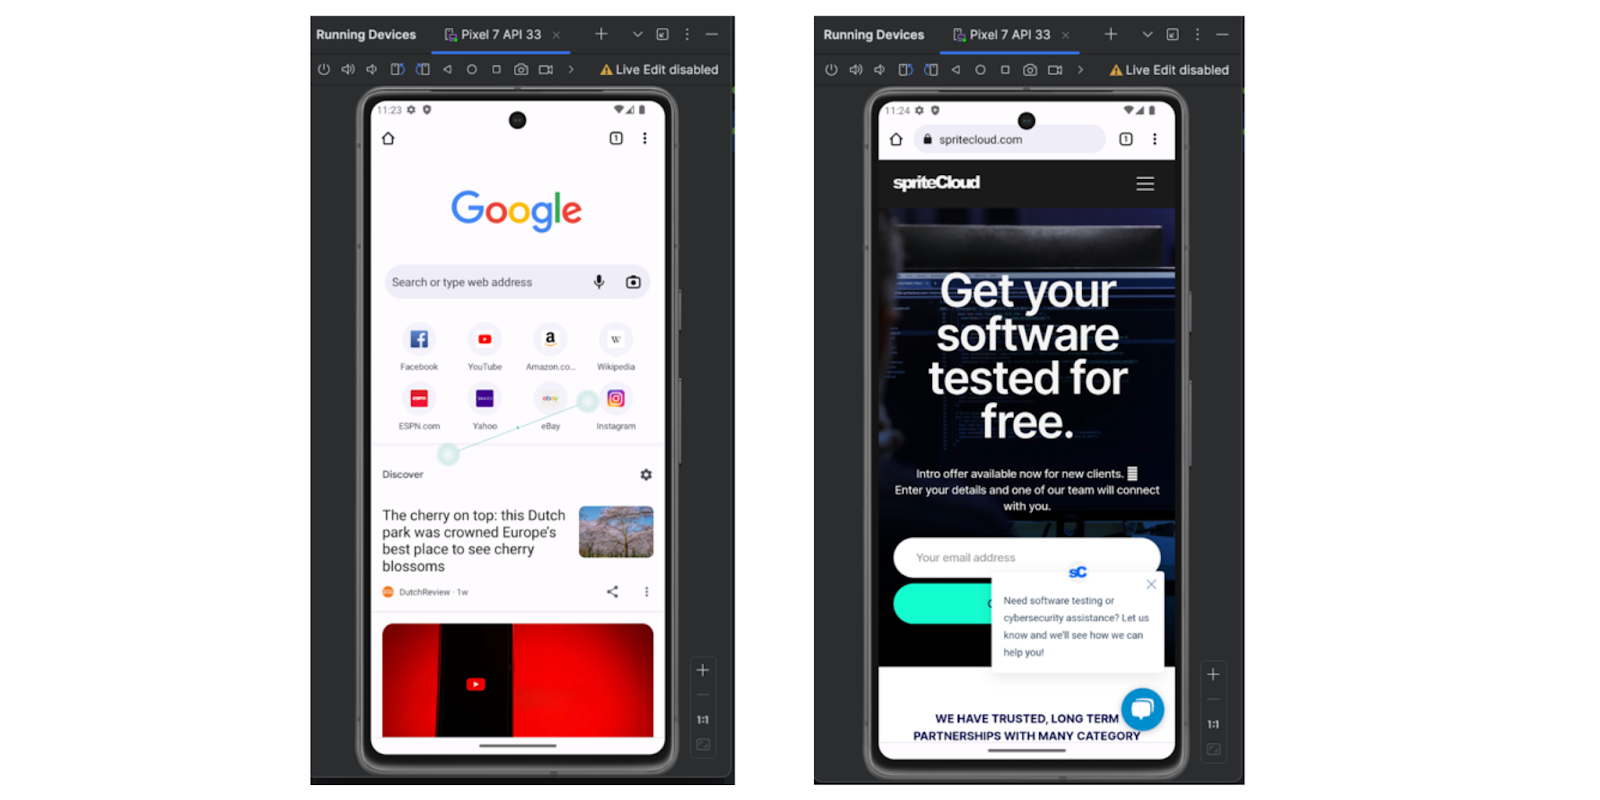
To find out the app package and activity, open the application into the emulator or devices to be in focus, and run those lines:

Using Appium Inspector for Element Identification
- Navigate within your application using Appium Inspector to pinpoint elements, documenting their IDs or XPaths.
- At Appium Inspector, for appium v2, it is needed to use the prefix appium: before each capabilites — but for appium V1, remove the appium: options and appium: prefix
- You need just one of the above information: avd or deviceName or udid, but not all. If you have duplicated avd or deviceName, the first one listed will be selected, and udid is an unique identifier.
- For app capabilities, for appium v2 it`s not supported relative paths — and for appium v1, you must use absolute paths.
- Save the JSON capabilities for later, with the Save As option:
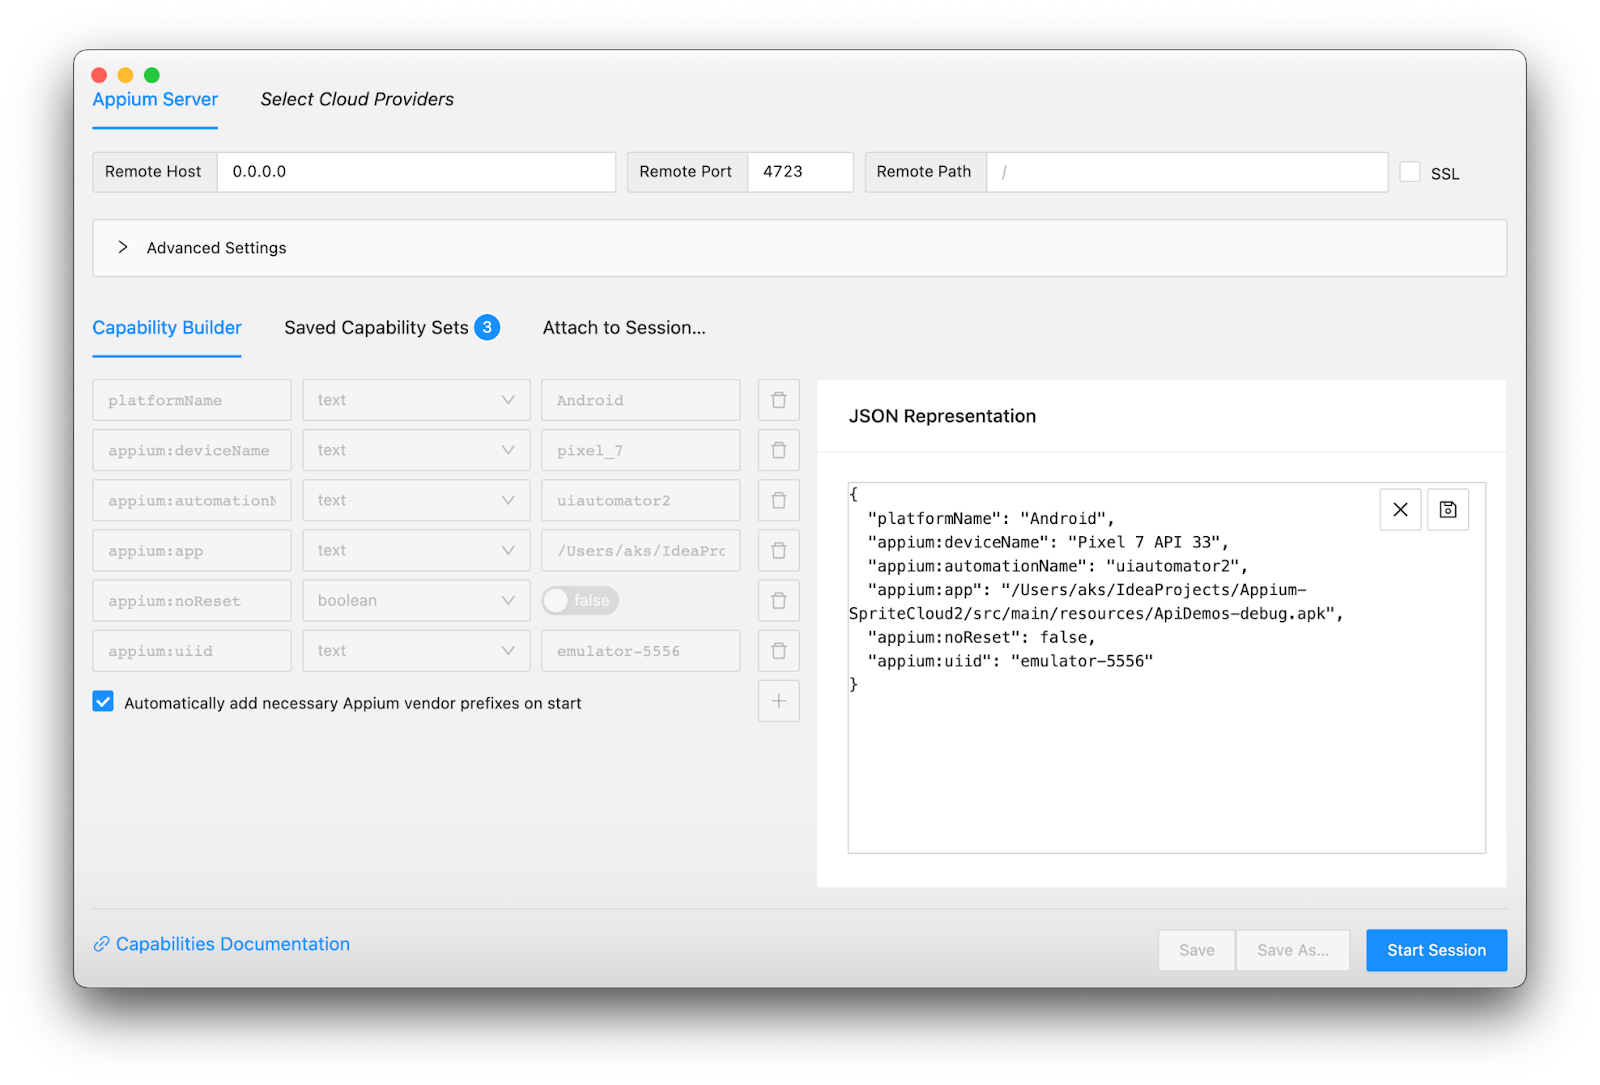
- Press ‘Start Session’
Appium Inspector — Connect to Appium Server — Capabilities
Appium Inspector will find and connect to the Appium Server, install the .apk application package, open it, and display the selected activity scr.
- Select any element
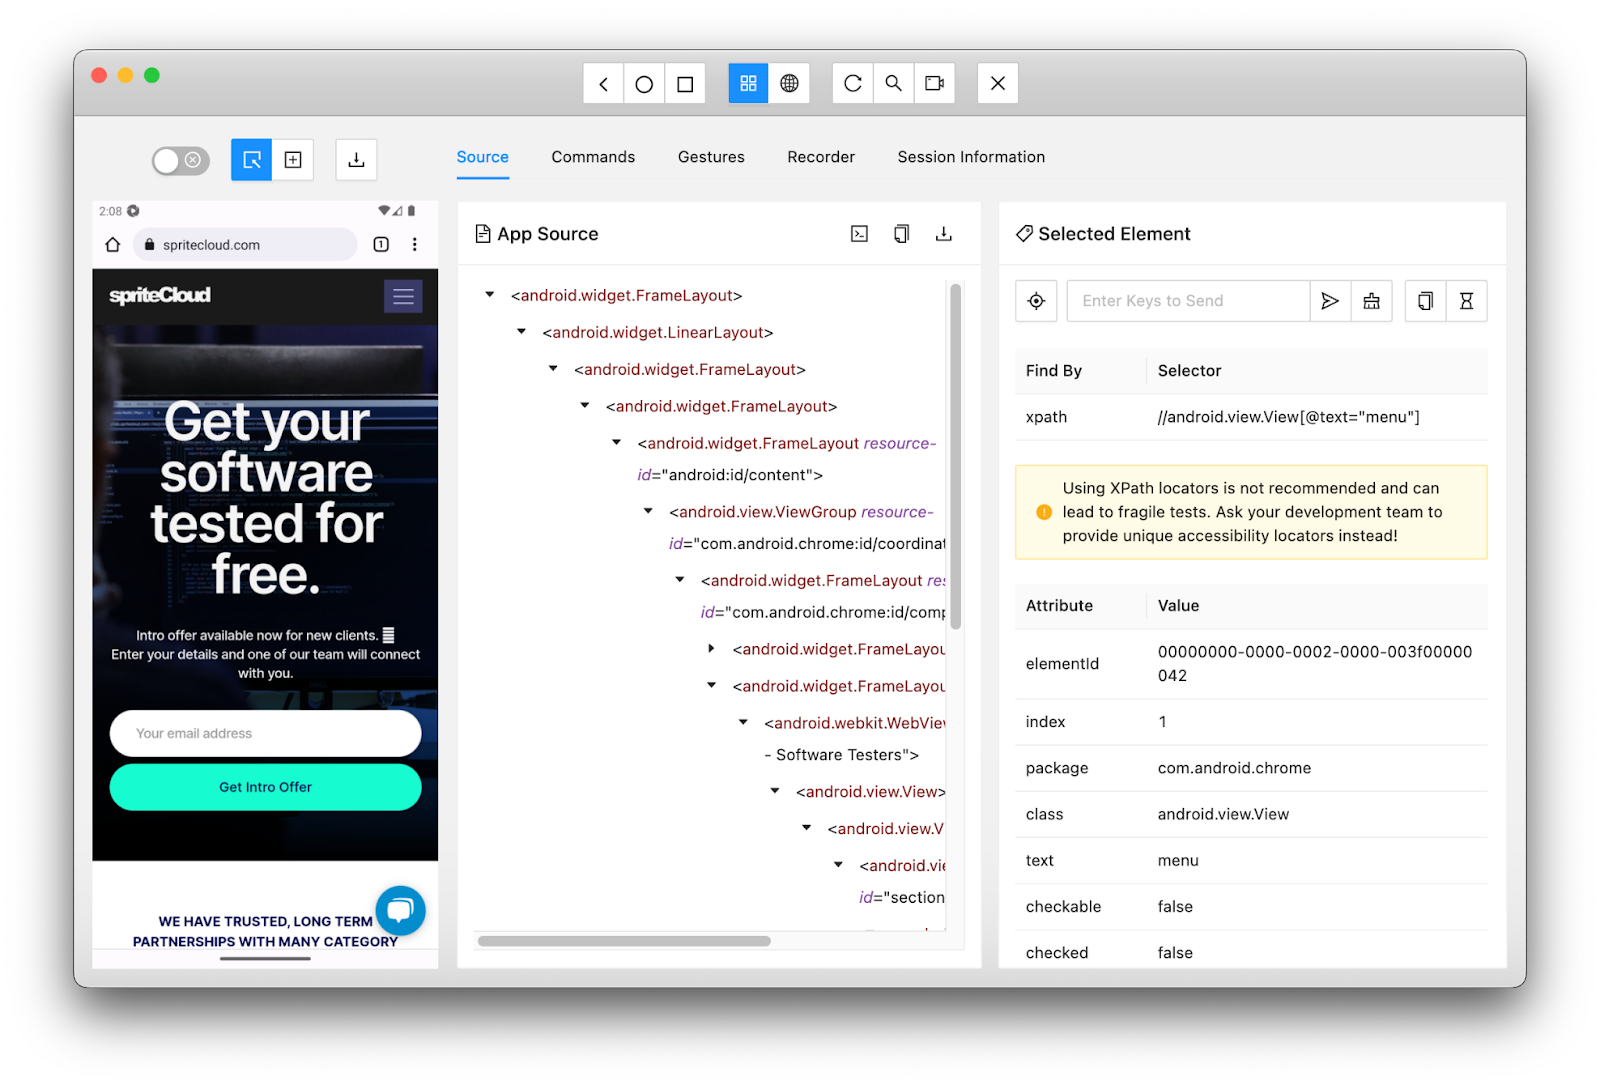
Appium Inspector — Connect to Appium Server — Select Element
On the left, we have the device screen. In the middle of the source, we have the tree (just like a DOM using Chrome DevTools/Inspector). On the right of the selected element, choose any interactable element, and you can get the selectors and properties. At the top, you can find some tools like back, home, and switch buttons, a refresh button, a search element, and recording, and the X button to end the session.
Final thoughts
In conclusion, Appium has become a cornerstone in mobile application testing across iOS and Android platforms. Its continuous evolution, bolstered by updates and enhancements, reflects its adaptability to the dynamic landscape of mobile development. With its robust features, compatibility across platforms, and strong community backing, Appium stands as a vital asset for testing teams, enabling them to maintain the quality and dependability of their mobile applications.