So, what is Playwright?
- Modern and Versatile Framework: Playwright, crafted by Microsoft, is a cutting-edge browser automation framework. It simplifies the process for developers by offering a unified API that seamlessly operates across various browsers like Chrome, Firefox, and Microsoft Edge.
- Cross-Browser Support: Playwright ensures your web applications perform consistently and reliably across different browsers, guaranteeing compatibility with major platforms.
- Speed and Efficiency: Recognised for its speed and efficiency, Playwright is an excellent choice for both testing and automating web interactions, making your development process smoother.
- Headless and Headful Modes: Whether you need faster execution or detailed debugging and interaction, Playwright provides flexibility. Run scripts in headless mode for quick execution or in headful mode for interactive debugging.
- Support for Multiple Languages: Playwright caters to developers using popular programming languages like TypeScript, Python, and Java. This means you can write automation scripts in the language you're most comfortable with; in this blog post, we'll focus on TypeScript.
- Native Event Emulation: Leveraging native browser automation APIs, Playwright accurately simulates user interactions, resulting in more reliable and realistic tests for your web applications.
- Powerful DevTools Integration: Unleash the full potential of browser DevTools with Playwright. This integration simplifies the inspection, debugging, and diagnosis of issues in your web applications, providing a robust toolkit for developers.
Comparison with other tools
Browser and Programming language Support
Selenium
1. Broad browser support, including Chrome, Firefox, Safari, Edge, and more.
2. Selenium Grid allows parallel testing across different browsers.
3. Offers support for multiple programming languages like Java, Python, C#, Ruby, and more.
Playwright
1. Supports multiple browsers: Chrome, Firefox, and WebKit.
2. Unified APIs across different browsers for consistent testing.
3. Seamless integration with JavaScript, TypeScript, Python, and more.
Cypress
1. Primarily focused on Chrome with ongoing support for other browsers.
2. Limited cross-browser compatibility compared to Playwright and Selenium.
3. Primarily JavaScript-based, and TypeScript only.
Community Support and Resources
Selenium
1. Robust community support with vast resources and plugins.
2. Extensive documentation catering to users at different skill levels.
Playwright
1. Growing community with active contributions.
2. Comprehensive documentation with Regular updates covering various aspects of the framework.
Cypress
1. Active community with extensive documentation.
2. Quick adoption and ongoing development.
Use Cases
Selenium
1. Versatile and suitable for a wide range of testing scenarios.
2. Established choice for regression testing, compatibility testing, and complex use cases.
3. Ideal for large-scale projects with diverse testing requirements.
4. No direct support for API.
Playwright
1. Ideal for cross-browser testing and scenarios requiring multiple browsers.
2. Suitable for projects with a focus on modern web technologies.
3. Efficient for end-to-end testing of web applications.
4. Easily automating API testing, and intercept API calls.
5. Screenshots, videos, and error traces are captured by default.
Cypress
1. Excellent for single-page applications (SPAs) with interactive features.
2. Well-suited for projects where real-time interactive testing is crucial.
3. Rapid development and testing cycles in a controlled environment.
4. Supports API testing.
5. Screenshots, videos are captured by default.
Learning Curve
Selenium
1. Slightly steeper learning curve, especially for beginners.
2. Comprehensive features may take time to master.
3. Extensive resources and community support aid in overcoming the learning curve.
Playwright
1. Approachable for developers with experience in modern web technologies.
2. Well-structured documentation reduces the learning curve.
3. Familiarity with JavaScript enhances ease of adoption.
Cypress
1. Quick setup and minimal dependencies contribute to a lower learning curve.
2. Intuitive commands and clear documentation make it user-friendly.
3. Learning is facilitated by the framework's straightforward architecture.
Limitations
Selenium
1. Selenium is open-source software, so you must rely on community forums to resolve technical issues.
2. Selenium cannot be used to automate tests on web services such as SOAP or REST.
3. For test reports, you must rely on plug-ins such as JUnit and TestNG.
4. It is impossible to conduct tests on images. Selenium must be integrated with Sikuli for image-based testing.
Playwright
1. Playwright does not support older versions of Microsoft Edge or IE11.
2. Playwright supports API testing, but it's APIRequest method does not support disabling follow redirects.
3. Playwright emulates mobile devices using desktop browsers instead of actual devices.
Cypress
1. Only JavaScript is supported for creating and running test cases.
2. Has limited support for iframes.
3. No multiple tabs support. Test is running in just one window
4. Due to its browser-based nature, it precludes the running of end-to-end tests that involve numerous platforms.
5. So many plugins that are supported but after a period Cypress do not support them.
6. Some feature such Replay.io, parallel testing are offered only in paid Cypress Cloud
Why Playwright?
- Versatility in Language Support: Despite being relatively new to the market, Playwright removes language barriers by supporting C#, Java, and Python. This flexibility makes it easy for those familiar with Selenium to quickly migrate and start utilizing Playwright's capabilities.
- Rapid Adoption and Popularity: Since its initial release in January 2020, Playwright has gained significant popularity. Its quick rise in the industry attests to its effectiveness and appeal among developers.

- DevTools Protocol Integration: Playwright stands out by leveraging the DevTools protocol to craft potent and stable automated tests. This integration allows developers to tap into the full potential of browser DevTools, enhancing the testing process.
- Direct Browser Control: Unlike relying on an intermediary translation layer, Playwright enables direct control and insight into the browser. This approach facilitates the simulation of more meaningful and realistic user scenarios, contributing to the accuracy of your tests.
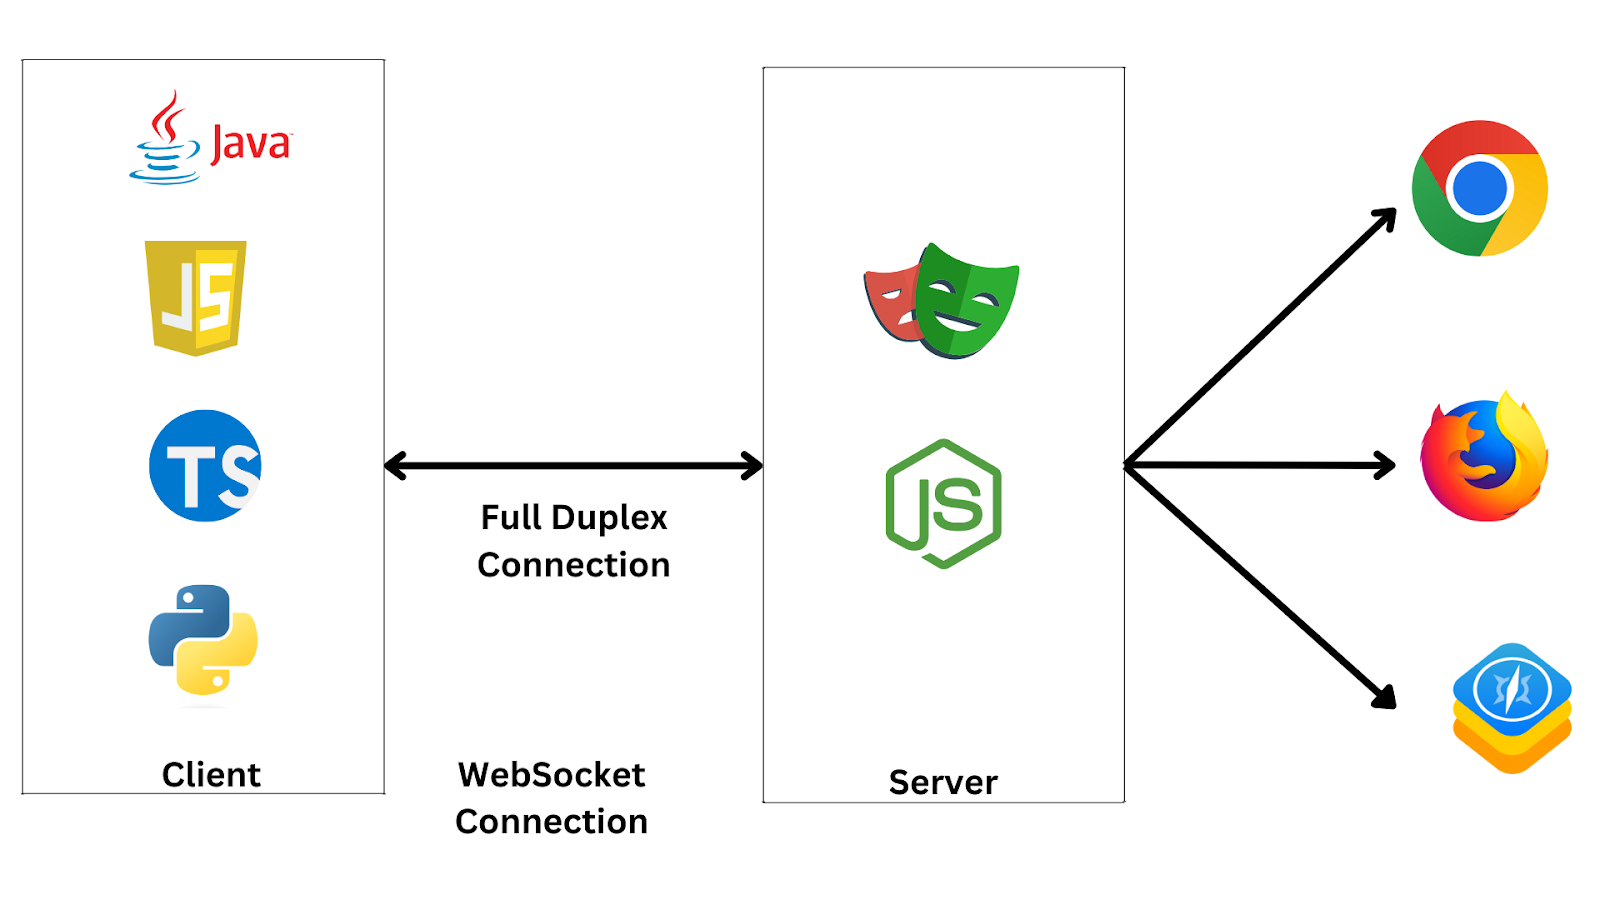
Playwright's architecture
Modern Architecture Alignment: Playwright's architecture is designed to closely align with modern browsers, operating out-of-process. This setup avoids the constraints of in-process test runners like Cypress, providing more flexibility.
Efficient Communication: Playwright opts for a WebSocket connection for bi-directional client-server communication. This method is faster and more efficient compared to traditional HTTP communication.
Concise Breakdown:
Client: Playwright offers API bindings in various programming languages, allowing seamless interaction with the framework. These APIs translate high-level commands into concise browser actions for developers.
Server: Facilitating communication between client scripts and supported browser engines, the Playwright Node.js server plays a pivotal role in the framework's functionality.
Client-Server Communication: Each script in Playwright establishes a low-latency WebSocket-based communication channel over a single TCP connection. This connection persists until the completion of the test, reducing the likelihood of test failure or flakiness. This efficient setup ensures that commands are executed quickly, outperforming alternative tools using HTTP connections.
Installation of Playwright
Pre-Requisites:
> Install Visual Studio Code: Download and Install Visual Studio Code(VSCode).
>Install NodeJS: Download and Install Node JS
Steps to install:
Step 1: Set up your Playground:
- Kick things off by creating a new directory, let's call it PlaywrightDemo, right within the confines of your VSCode.
Step 2: Navigate to your space:
Open the directory in Visual Studio Code with this simple dance:
- Click on File
- Glide over to Open Folder
- Take a moment to pick the new folder(PlaywrightDemo)
Step 3: Let’s chat in the Terminal:
- Stroll over to the Terminal Menu in VS Code.
- Give it a warm welcome by selecting New Terminal.
Step 4: Summon the Playwright Magic:
- It’s showtime! Dive into the terminal and gracefully type in the command below to set the Playwright wheels in motion. Ready, set, go!
> npm init playwright@latest
npm: Stands for Node Package Manager. It's a package manager for JavaScript and the default package manager for Node.js.
init: A command used to create a new package.json file, which is a metadata file containing information about the project and its dependencies.
playwright@latest: Specifies the Playwright package to be installed. @latest ensures that the latest version of the Playwright package is installed.
Note: The command mentioned above prompts a series of questions. Kindly supply the relevant inputs. For this tutorial, we'll be working with the TypeScript language.
So once the playwright install it will enable the project structure in your local,
Creates Package.json:
Initiates the creation of a `package.json` file, providing essential metadata for the project.
Installs npm Library:
Handles the installation of the necessary npm library, ensuring your project has the required dependencies.
Sets Up Basic Files and Folders:
Ensures the establishment of fundamental files and folders:
- tests folder:
- This directory houses the actual test scripts. By default, an `example.spec.ts` file is generated within.
- .gitignore:
- A crucial file for those utilizing a git repository, aiding in ignoring specified files.
- package.json and package-lock.json:
- These files play a role in dependency tracking and provide a shortcut for test execution, among other functionalities.
- playwright.config.ts:
- This serves as the global configuration file for Playwright, allowing customization with available options. Adjust it to suit your preferences and requirements.

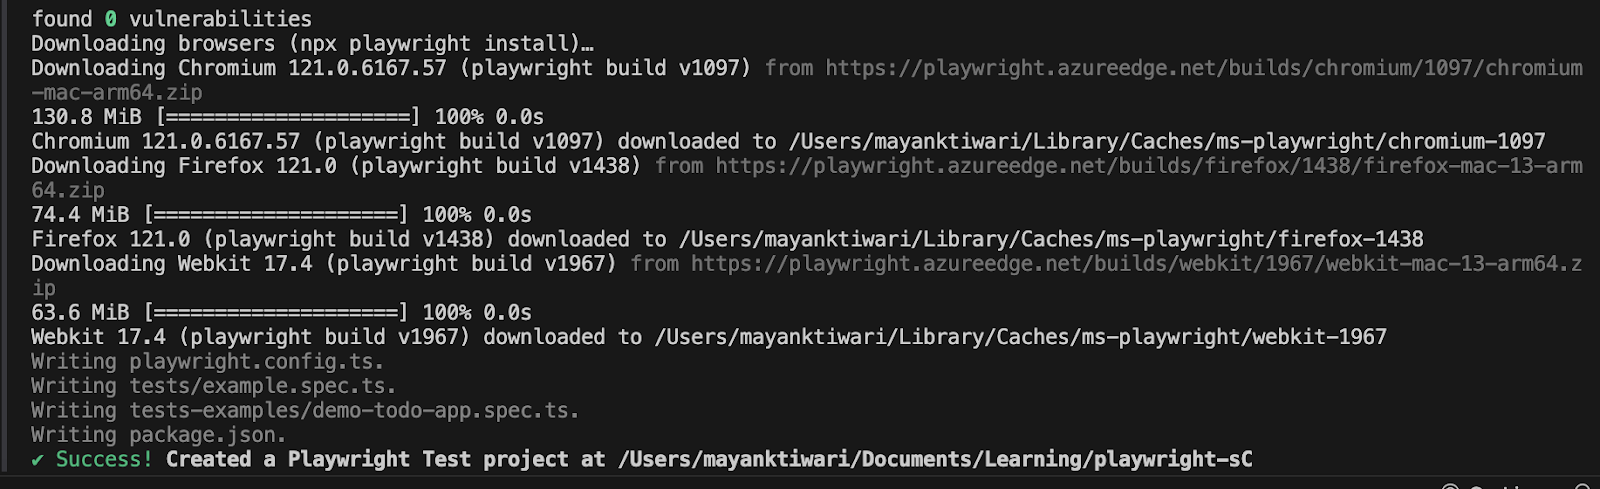
Step 5: Bring in the Browsers:
- While Playwright can work with existing browsers, it's advised to use Playwright's own browsers to avoid potential test issues. You can easily install these browsers using the command below:
> npx playwright install
Step 6: Run the sample test:
Playwright itself provide demo.spec.ts(sample test case) files to execute the test in local, below is the command to run the test present in tests folder
> npx playwright test
Note : We will be providing explicit demonstration of the real time project here below and will share you the working Boilerplate code(git repo) to kick start your playwright project
The anatomy of a Playwright test
We took this below playwright codebase for an example to explain the Anatomy of the playwright, We are explaining for both UI & API test case automation prospective.
https://gitlab.spritecloud.com/public-testsuites/playwright-boilerplate/-/tree/main
For UI Automation:
Let’s break down the anatomy of the playwright setup by exploring the sample UI test (tests/UiTests.spec.ts).
Scenario:
- Open the browser
- Navigate to https://www.spritecloud.com/
- Validate the Home page title
test('Should navigate home and assert the heroHomeTitle text', async ({ page }) => {
// This will point to the baseUrl in the playwright.config.ts
await page.goto('/');
expect(page.url()).toBe('https://www.spritecloud.com/');
const heroHomeTitleText = await page.locator('h1[class="hero_home_title"]').textContent();
expect(heroHomeTitleText).toBe('Your Trusted Testing & Security Partner');
});
Key Components:
1. Test Function:
test('Should navigate home and assert the heroHomeTitle text', async ({ page }) => {...}):
The test function is a Playwright-specific function used to define a test case. It takes a description and an asynchronous callback function as parameters.
2. Navigation:
await page.goto('/');:
Navigates the browser to the specified URL. In this case, it navigates to the root URL ('/').
3. URL Assertion:
expect(page.url()).toBe('https://www.spritecloud.com/');:
Asserts that the current URL matches the expected URL (https://www.spritecloud.com/).
4. Locating and Extracting Text Content:
const heroHomeTitleText = await page.locator('h1[class="hero_home_title"]').textContent();
Locates the HTML element <h1> with the class 'hero_home_title' and retrieves its text content.
5. Text Content Assertion:
expect(heroHomeTitleText).toBe('Your Trusted Testing & Security Partner');
Asserts that the text content extracted from the <h1> element matches the expected text ('Your Trusted Testing & Security Partner').
Overall Flow:
- Navigation: Navigate to the specified URL.
- Assertion (URL): Ensure that the current URL matches the expected URL.
- Locate Element: Find the <h1> element with the class 'hero_home_title'.
- Extract Text: Get the text content of the located element.
- Assertion (Text): Confirm that the extracted text matches the expected text.
Additional Notes:
The test case utilises asynchronous functions to handle the asynchronous nature of browser interactions.
The code assumes the existence of an HTML structure where an <h1> element with the class 'hero_home_title' contains the specified text.
For API Automation:
Let's understand how the playwright API test works. Open the (tests/ApiTest.api.ts) file.
In this example we are automating test scenarios with HTTP Post requests.
Scenario :
- Automating the API https://reqres.in/api
- Calling HTTP Post Request with parameters
- Validating the response and its fields
test('Should create an user', async ({ request }) => {
const sampleData = {
name: 'John',
job: 'Programmer',
};
const response = await request.post(`${apiUrl}/users`, {
data: sampleData,
});
expect(response.ok()).toBeTruthy();
const responseJson = await response.json();
expect(responseJson.createdAt).toBeDefined();
expect(responseJson.id).toBeDefined();
expect(responseJson.job).toBe(sampleData.job);
expect(responseJson.name).toBe(sampleData.name);
});
Key Components:
1. Test Function:
test('Should create a user', async ({ request }) => {...}):
The test function is a Playwright-specific function used to define a test case. It takes a description and an asynchronous callback function as parameters.
2. Sample Data:
const sampleData = { name: 'John', job: 'Programmer' };:
Defines a sample data object representing the information of the user to be created.
3. API Request:
const response = await request.post(`${apiUrl}/users`, { data: sampleData });
Sends a POST request to the specified API endpoint (${apiUrl}/users) with the sample data.
4. Response Assertion:
expect(response.ok()).toBeTruthy();
Asserts that the HTTP response status is considered "OK" (e.g., 200).
5. Response JSON Extraction and Assertions:
const responseJson = await response.json();
expect(responseJson.createdAt).toBeDefined();
expect(responseJson.id).toBeDefined();
expect(responseJson.job).toBe(sampleData.job);
expect(responseJson.name).toBe(sampleData.name);
Extracts the JSON content from the response and performs various assertions on the properties of the JSON object. It ensures that the expected properties (createdAt, id, job, and name) are defined and have the correct values.
Overall Flow:
- Data Preparation: Create a sample data object for the user.
- API Request: Send a POST request to the API endpoint with the sample data.
- Response Assertion (Status): Ensure that the response status is "OK".
- Response JSON Handling: Extract the JSON content from the response.
- Response Assertions (JSON): Validate specific properties of the JSON object received from the API.
Additional Notes:
This test case assumes the existence of an API endpoint that supports creating users.
The request object is likely provided by Playwright's test runner and simplifies handling HTTP requests.
Assertions are used to verify that the API response meets the expected criteria.
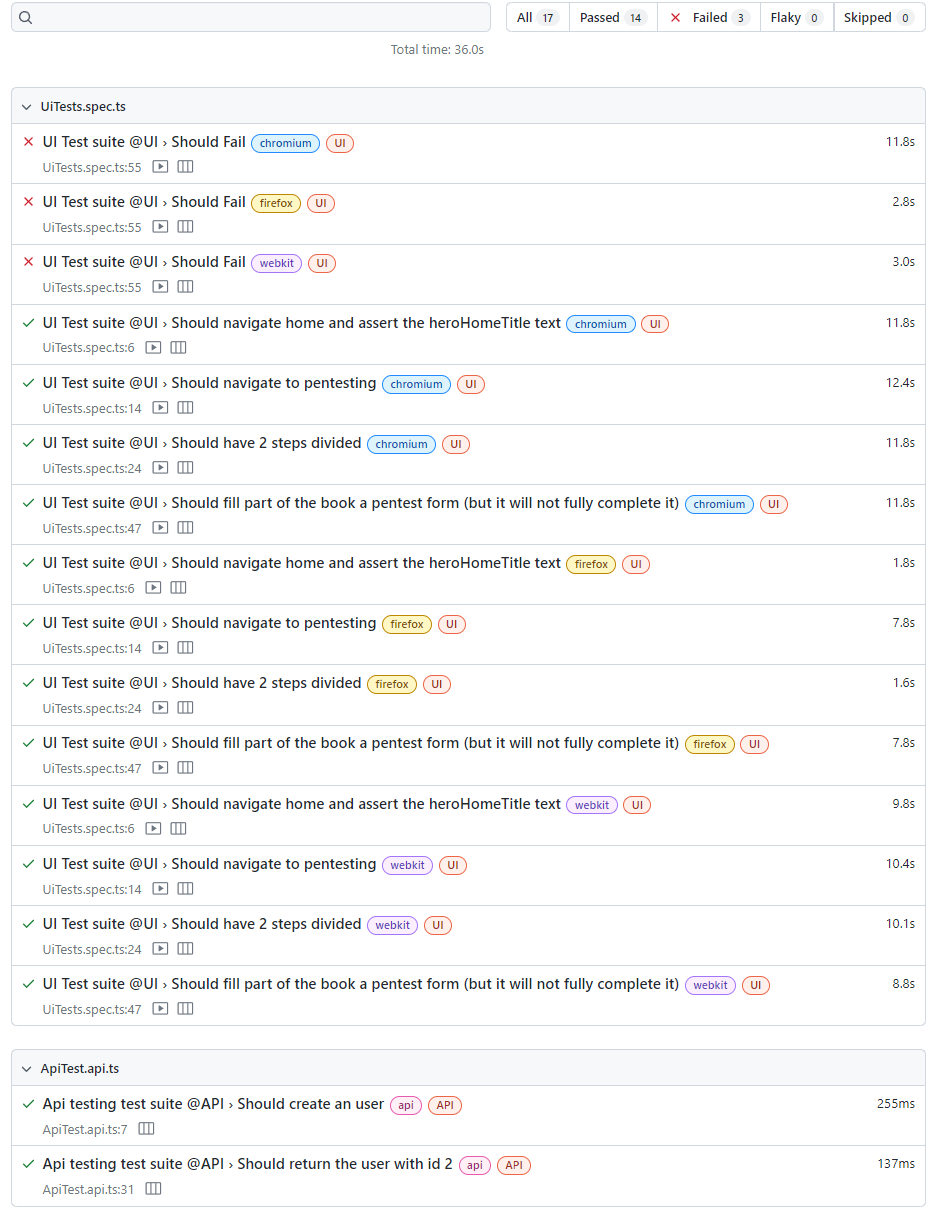
Examining test report
To review the test reports, there are two conditions:
1. If any test fails, the system will automatically launch the web browser to display the report containing information about the failing tests.
2. If all tests pass successfully, execute the command "npx playwright show-report" in the terminal.
You can customise this configuration in the "playwright.config.ts" file. The "trace" variable offers various options, and the "video" variable allows you to retain a video recording of the test run.
Within the report, individual files are presented separately, each tagged with the corresponding browser used. For each test, you can view the executed code along with the trace and video (if enabled).
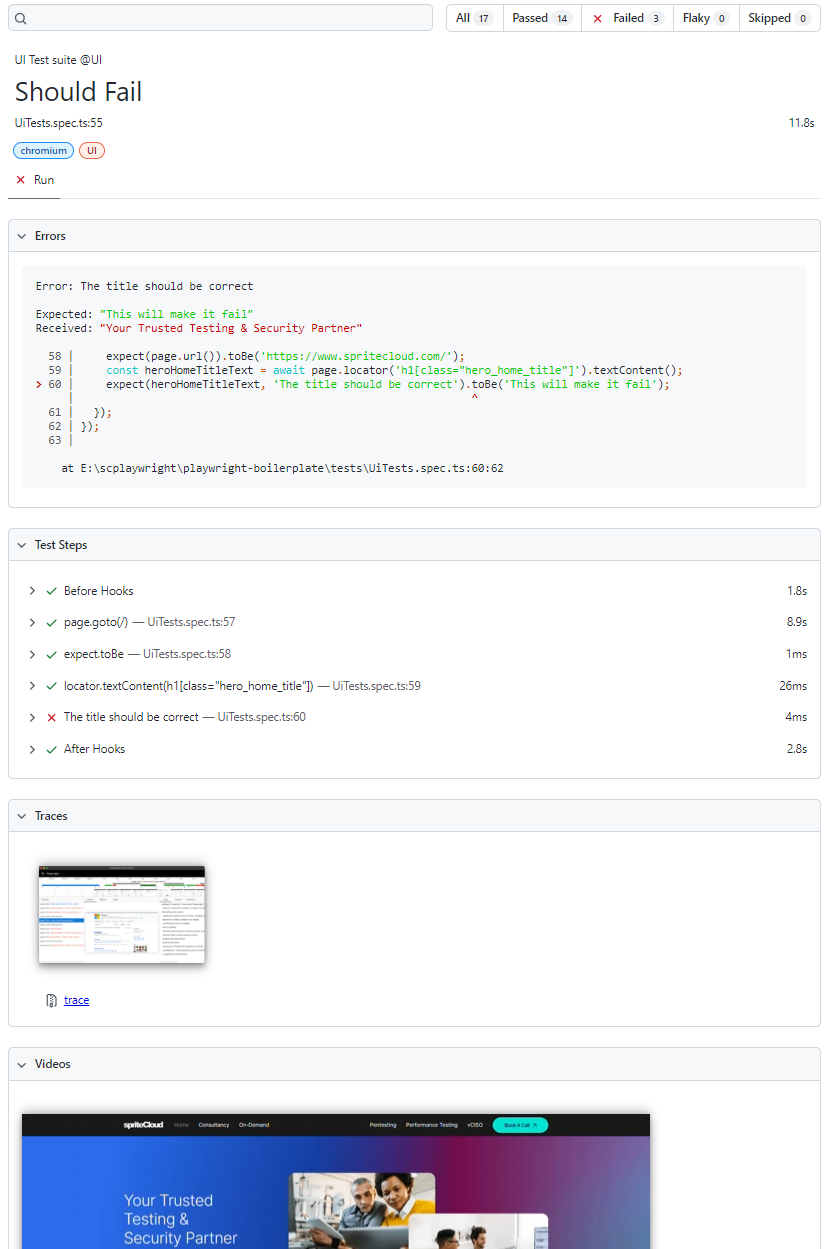
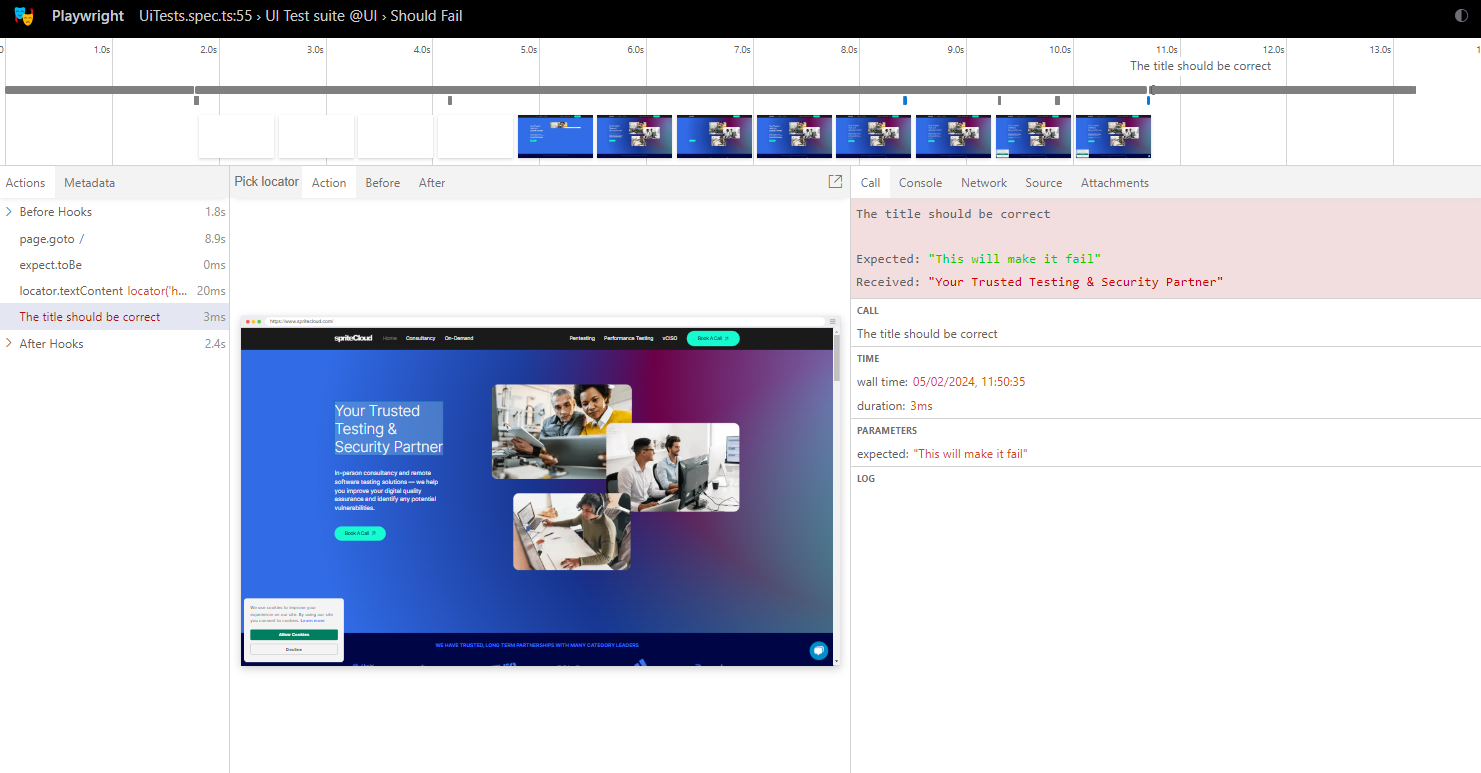
The trace provides a comprehensive overview, allowing you to navigate through the code, observe network requests, and review console outputs. At the top of the trace (where the images are located), you can click and drag the mouse to focus on specific sections of the network or console calls, eliminating the need to inspect every recorded entry.
Debugging tests
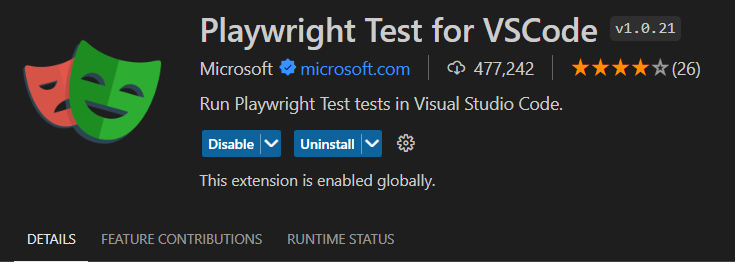
If a test fails, the easiest way to debug it is using the Playwright Test for VSCode extension and a breakpoint.
You can right click on the arrow and select “debug” a browser window will open and the test will start running.
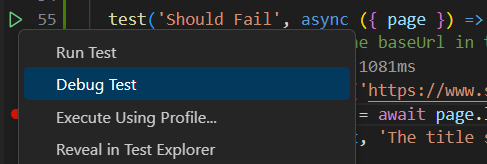
You will have a hint whether the code is working or not. In the following example, the selector is invalid, therefore, the code is waiting for a condition to be fulfilled but it seems frozen.

In the terminal, you will be presented with the error message.

After you fix all the problems, the test will pass again.

Setting up the pipelines in Gitlab
In order to create a pipeline to integrate our code we should create a yml file inside the repository. We assume that the ready already knows how to create a code repository and push the solution.
Here you have a sample code that includes the artifacts
# Official framework image. Look for the different tagged releases at:
# https://playwright.dev/docs/ci
image: mcr.microsoft.com/playwright:v1.41.1-jammy
# This folder is cached between builds
# https://docs.gitlab.com/ee/ci/yaml/index.html#cache
cache:
paths:
- node_modules/
Run playwright tests:
script:
- npm ci
- npx playwright install --with-deps
- npx playwright test
artifacts:
paths:
- playwright-report
expire_in: 1 week
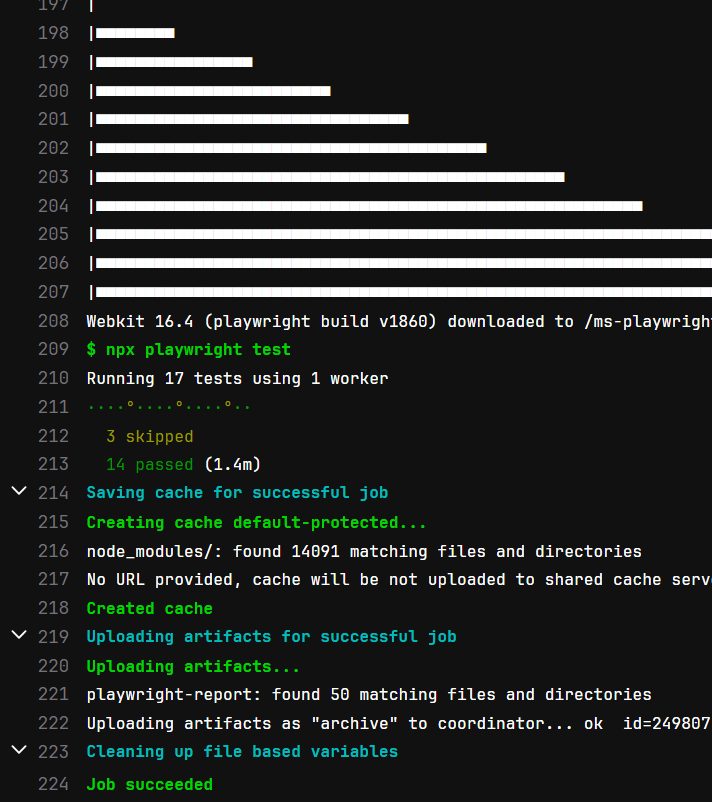
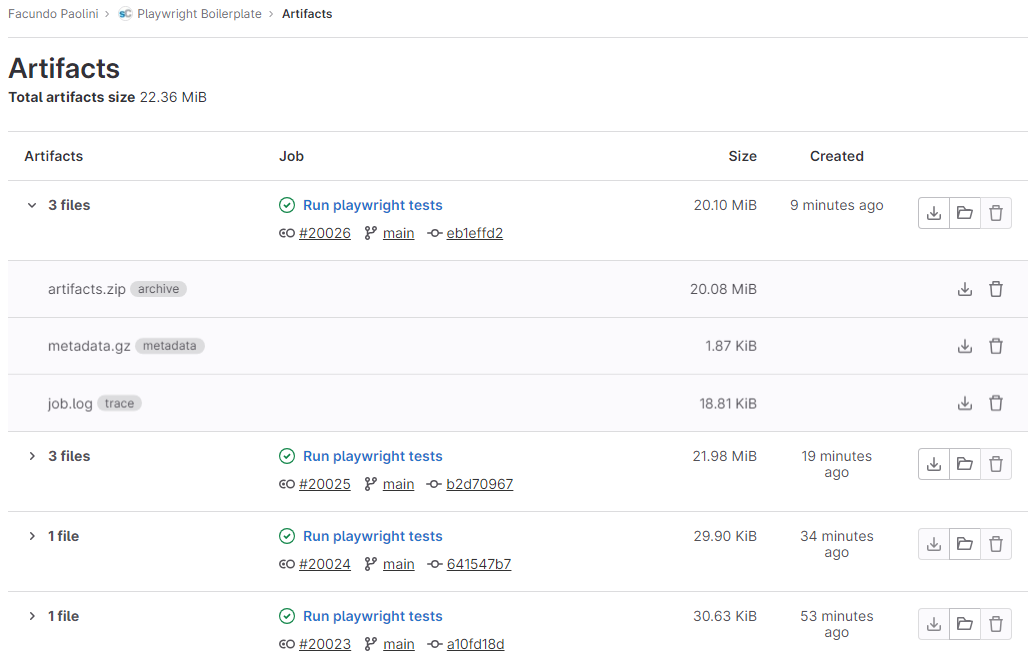
Inside the jobs you will be able to see the logs of the run and inside artifacts you will be able to download the report
You can see the status of your pipelines inside gitlab from this tab:

Our boilerplate project used in this guide
If you're interested in using our project, please feel free to fork it from this repository:
https://gitlab.spritecloud.com/public-testsuites/playwright-boilerplate/-/tree/main
It includes Playwright 1.41.1 configuration, practical examples, and incorporates ESLint for maintaining good coding standards, along with Prettier for enhanced code formatting.
Our final thoughts
After some years of utilising this framework, our spriteCloud team has developed a strong affinity for Playwright. Its user-friendly interface and straightforward learning curve make it a standout choice for rapidly creating productive solutions. Getting started was a breeze, and establishing efficient pipelines proved to be a straightforward process.
Ready to unlock the true potential of Playwright?
Contact projects@spritecloud.com for a free consultation and discover how we can transform your testing process!