
1. What is Robot Framework?
Robot Framework is an open-source automation framework and robotic process automation (RPA) tool. It is primarily aimed towards Acceptance Testing and is widely regarded as a user-friendly and versatile tool. Users can create their own keywords or utilize keywords from existing libraries based on Python, Java, and others. Once you have everything installed and set up, the only thing left to do is choose which libraries you will need for your testing purposes. Among the many available libraries, the most applied are SeleniumLibrary for web testing, AppiumLibrary for mobile testing, DatabaseLibrary for database testing, and RESTInstance for API testing.
2. Why would you choose Robot Framework?
For starters, it is free! and as any good dutchie would agree: we love it when things are ‘gratis’. If you are still not sure that this is the right tool for your test automation purposes, then let’s take a look at why you should lean towards this automation framework over other offerings in the market.
Open-source and extensible
Robot framework is open-source meaning that anybody can inspect, modify, or update the code. Programmers therefore are able to add new features or even fix bugs to the source code. The nice thing about being open-source is that this also means it is free to use. The framework is extensible and can integrate with many other tools, this allows you to create efficient automation solutions.
Easy to learn and use
Generally, Robot Framework is considered to be a user-friendly tool, meaning there is a short learning curve. Robot Framework allows you to create your own personalized keywords in your own language, and by keeping these keywords simple and concise even your colleagues who do not work in the IT department can also understand the steps that are being taken in your automated test scenarios. We can finally avoid the lengthy demos explaining to Susan what every step of every test case does. Phew! Robot Framework allows you to use predefined keywords from existing libraries without any additional setup required. The only extra thought you need to give is to decide what libraries you need to import to accomplish your testing goals. You can also simplify test cases by creating your own keywords for a set of test steps. This in particular promotes readability and ease of use as test cases can be simplified by reusing these personalized keywords.
3. Robot Framework Features
What are some of the features and concepts Robot Framework has to offer?
- Test Suite
A test suite is a collection of test cases that can be organized hierarchically. This allows for the grouping of related test cases, thus forming a test suite.
- Test Case
A test case is a set of predefined actions and verifications designed to validate parts of a System Under Test(SUT).
- Keyword-driven
Keyword for the building blocks of the Robot Framework test cases. They represent actions or verifications and may be built-in, supplied by libraries, or user-defined for specific functions. They make the test scenarios easier to interpret.
- Libraries
They provide a collection of keywords that can be called upon within test cases. Robot framework includes built-in libraries but additional can be imported and installed.
- Built-in libraries include keywords for the most commonly used functions such as file operations, string manipulation as well as logging.
- External libraries provide further, specialized functionality for tasks specific to testing types such as Web Testing (SeleniumLibrary), mobile testing (AppiumLibrary), API Testing(RESTInstance), and database testing (DatabaseLibrary)
- Variables
Variables are used to store values and may be reused throughout a test scenario. They enable maintainability within the test case/suite. Here are some examples of such:
- Scalare: Represent a single value. e.g. ${URL}
- List: Represents a list of values. e.g. @{USERS}
- Dictionary: Represents a key-value pair collection. e.g. &{USER}
- Settings
The settings section of a test suite or resource file is used to configure the test environment. Common settings include:
- Library: Importing external libraries.
- Resource: Importing resource files that contain variables and user-defined keywords.
- Variables: Importing variable files.
- Suite Setup/Teardown: Actions to be performed at the beginning or end of a test suite.
- Test Setup/Teardown: Actions to be performed at the beginning or end of each test case.
- Resource Files
These are used to store the reusable keywords and variables that can be imported into test suites. They come in handy with the organization and maintenance of larger test projects.
- Tags
Tags are used to categorize and control the execution of test cases. They allow for selective running of tests and filtering of test results.
- Data-Driven Testing
Data-driven testing is a technique where the same test case can be executed multiple times with different input data. Robot Framework supports this using the ‘FOR’ loop, and by reading data from external sources like CSV files.
- Reporting and Logging
Robot Framework automatically generates detailed HTML reports and logs after test execution. These provide insights into the test execution process and results, making it easier to identify and troubleshoot issues.
4. Types of Testing with Robot Framework
See the types of testing that can be performed with Robot Framework:
Acceptance Testing
Acceptance testing verifies if the software meets the requirements set by the client or stakeholders. These tests are usually written from a user's perspective. The aim of acceptance testing is to ensure the system behaves as expected in production. In Robot Framework, acceptance test cases can be written and executed using the robot command-line tool or via an IDE. Popular IDE tools include Visual Studio, IntelliJ IDEA, and PyCharm.
Integration Testing
With integration testing, you test different parts of the software as a group. This testing technique aims to identify bugs that arise when different components are combined and interact with each other. Integration testing is typically performed in the early stages of the development cycle. Identifying issues early on helps save costs and time.
Performance Testing
Performance testing evaluates how the system performs under specific conditions. It assesses the stability and response of the system under various workloads. There are different types of performance tests, including load testing, spike testing, stress testing, and endurance testing.
API testing
With API testing, one can check if the API is working as expected. These tests can be run manually or can be automated with a testing tool. SOAPUI and Postman are popular tools for testing APIs, but you can even perform API testing with Robot Framework.
Functional testing
With functional testing, the basic functionality of the software is tested against the predetermined requirements. There are a lot of different types of functional testing, which will not be covered in this article.Overall it is fair to say that you can perform loads of different types of testing with Robot Framework. Even regression testing, mobile testing, and UI testing can be implemented. Let’s take a look at the advantages and disadvantages of Robot Framework.
5. Advantages and Disadvantages
Let’s take a look at some advantages Robot Framework has to offer:

Advantages
Open source: As an open-source framework, Robot Framework is completely free to use, making it an attractive and popular choice for automating test cases. There is nothing stopping you from downloading the tools necessary to begin your journey testing random websites.
Keyword driven: With the Robot framework, it is easy to rapidly create different types of test scenarios using a keyword-driven approach. The main advantage of this is that keywords can be re-used throughout different test cases. Personalized keywords are defined in different files, to ensure the test cases are as clear, concise, and as easy to read as possible. In most cases, the user can already use keywords from the existing library.
Extensibility: More than 100 libraries are available to download!, each with its own keywords which once the library is installed is ready to use.
Support different types of testing: As mentioned, with Robot FrameWork you can develop automated test cases for many different types of testing, which makes it an interesting tool if you need to perform other types of testing as well.
Platform independent: Robot Framework does not discriminate, it works on multiple operating systems such as Windows, macOS, and Linux.
Detailed reports: Robot Framework generates detailed reports, which allows you to easily find bugs in your test cases. It shows you where the test failed in which test step, if set up properly of course.
Large community: There is an active community where developers and testers share their work, and help each other out when facing problems with Robot Framework. On their website, you can connect with fellow testers via Slack, find information on the Forum, or join Robot framework groups on Linkedin or Facebook.
Disadvantages
Limited support: Due to the fact that Robot Framework primarily has a focus on UI testing, there is limited support for Database testing or non-UI testing. Furthermore, even though it is great that you can make your own custom library, it does mean that there will be limited support available.
Complexity: Robot Framework is considered easy to use, but when it comes to more complex scenarios it is necessary to have more in-depth knowledge about how to create your own keywords or your own library. Gaining this knowledge takes time which should be taken into consideration.
Debugging: When it comes to debugging the test cases, it can become quite a challenging task, often mistakes that are made are syntax errors and incorrect use of variables. Debugging your test cases is even more challenging if there is a lack of knowledge on how to approach debugging.
6. Installation Guide
Step-by-Step Installation and Verification
Let’s take a look at how to set up Robot Framework so that you can begin to write and execute your very own test cases.
Install IDE
For writing and running your test cases it is recommended to install an integrated development environment (IDE) there are several IDEs available but in this installation guide, we will show you how to download and install PyCharm.Click on this link which will automatically direct you to all the versions of Pycharm. You have the option to choose between professional or community editions. For the professional edition, you will need to pay eventually so for now we will focus on the community edition.Select the version that applies to you depending on which type of computer you are working from. Download the correct version and install the Pycharm IDE. After installing the IDE all you need to do is accept the terms and conditions and you are ready to start.Of course, you are free to choose to download any other IDE, other popular integrated development environments are Visual Studio Code and IntelliJ IDEA.
Install Python
The next thing we are going to do is install Python. Click on this link to go to the downloads page of Python. By default, it shows the latest version of Python for the operating system you are working on.
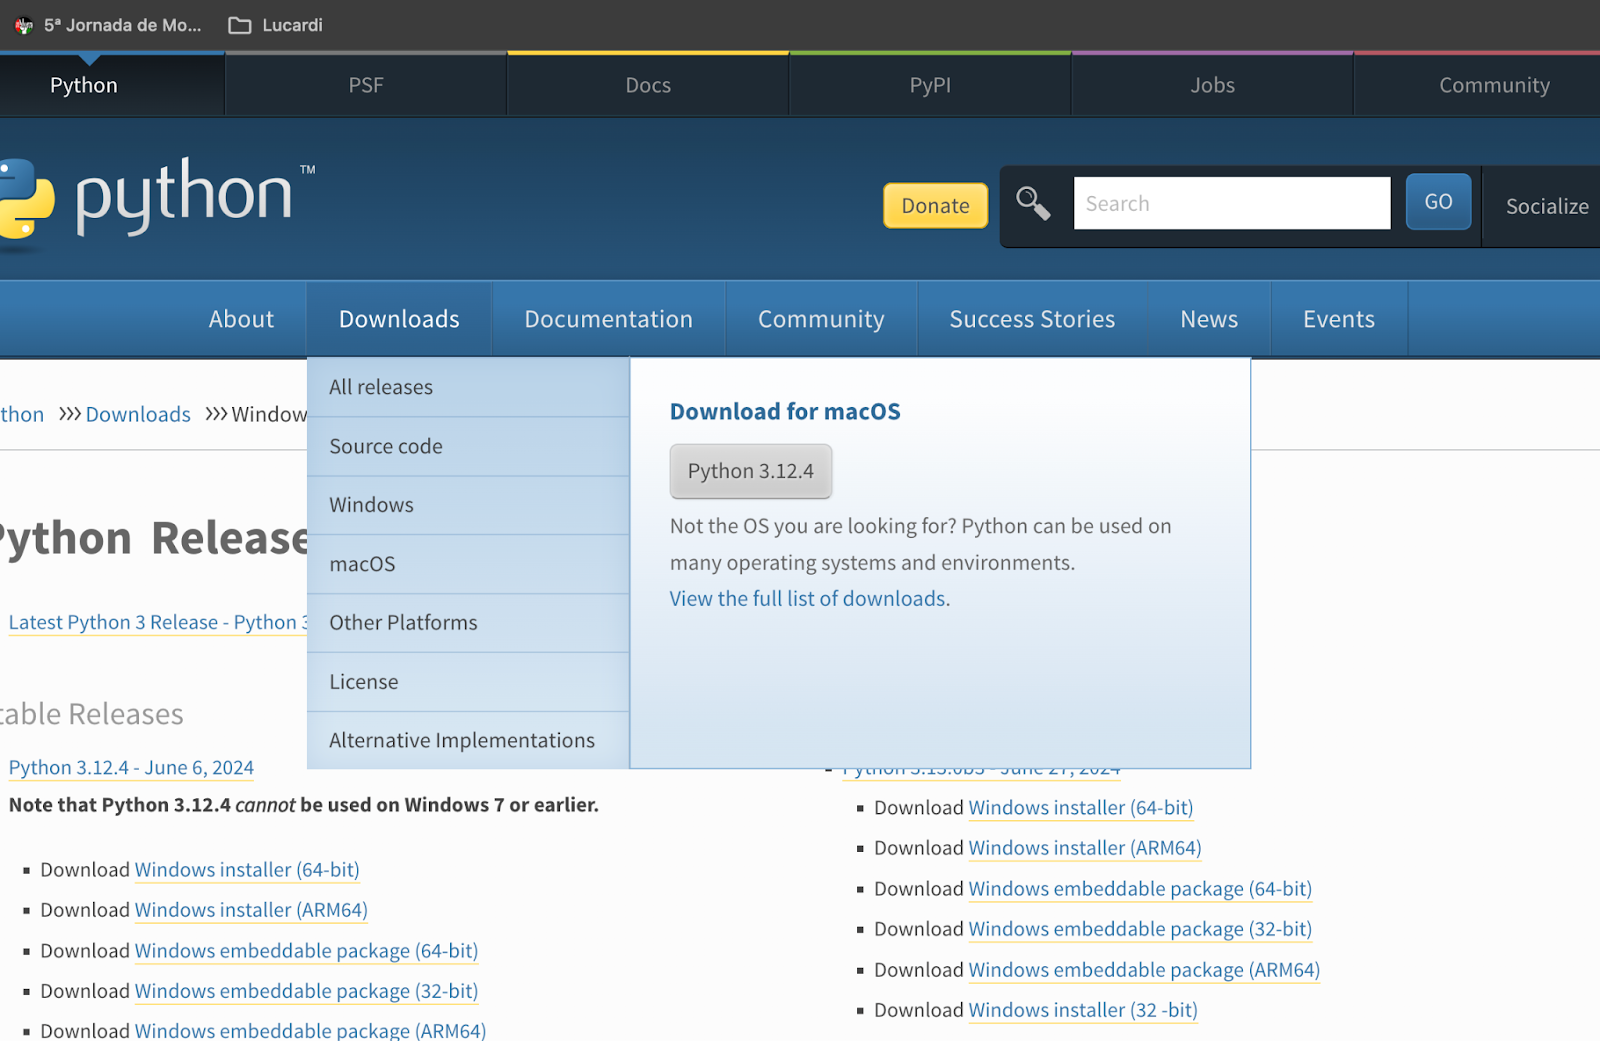
Choose the right version of Python for your operating system and click on download. Once downloaded, install Python and make sure before clicking on Install Now to tick the box add python.exe to PATH. This will allow you to run Python scripts and access the Python packages in the command prompt or terminal, regardless of which directory you are working from.If you forget to tick this box during the installation make sure to manually add the PATH, and follow the following steps for the Windows operating system:
- Go to the start menu
- Type in edit environment variables
- Click on edit environment variables for your account (control panel)
- Once you are in system properties, click on Open Environment Variables
- Add PATH to System Variables
- Copy the PATH where your Python version and Python scripts are located
See example below:C:\Users\<username>\AppData\Local\Programs\Python\<Python Version>\
C:\Users\<username>\AppData\Local\Programs\Python\<Python Version>\Scripts\
If your Python version and scripts are located somewhere else, please make sure to either change the location or copy the correct location.Follow the following steps for macOS
- Open the terminal on your Mac
- Type in the following command
touch .bash_profile
- Open the file by typing in the following command in the terminal
open -e.bash_profile
- Copy & paste the following PATH in the file
PATH=”/Library/Frameworks/Python.framework/Versions/X.X/bin:${PATH}”
- Make sure to update the version according to the version you downloaded.
- To save the edit press COMMAND + S
- To exit the file press COMMAND + Q
Or you can just uninstall the application and download it again and then of course make sure you check the box.
Install Pip
Pip should have been automatically installed when installing Python but in order to check if it has been installed, run the following commands:Windows:pip –versionIf it is not installed use the following command to install the pip
python -m ensurepip
macOS:
pip3 -V
If it is not installed use the following command to install the pip
python3 -m ensurepip
Install SeleniumLibrary
The next thing to do is to download the Selenium Library so that you can start to use existing keywords for web testing rather than having to create your own.Run this command Windows:
pip install robot framework-selenium library
macOS:
pip3 install robot framework-selenium library
Creating new file
We finally reached the part where we were ready to create our own first project and file in order to start testing. Let’s first start off with opening PyCharm. When you open pyCharm you get the option to create a New Project, click on this button.

After having created a New Project the following image will appear:
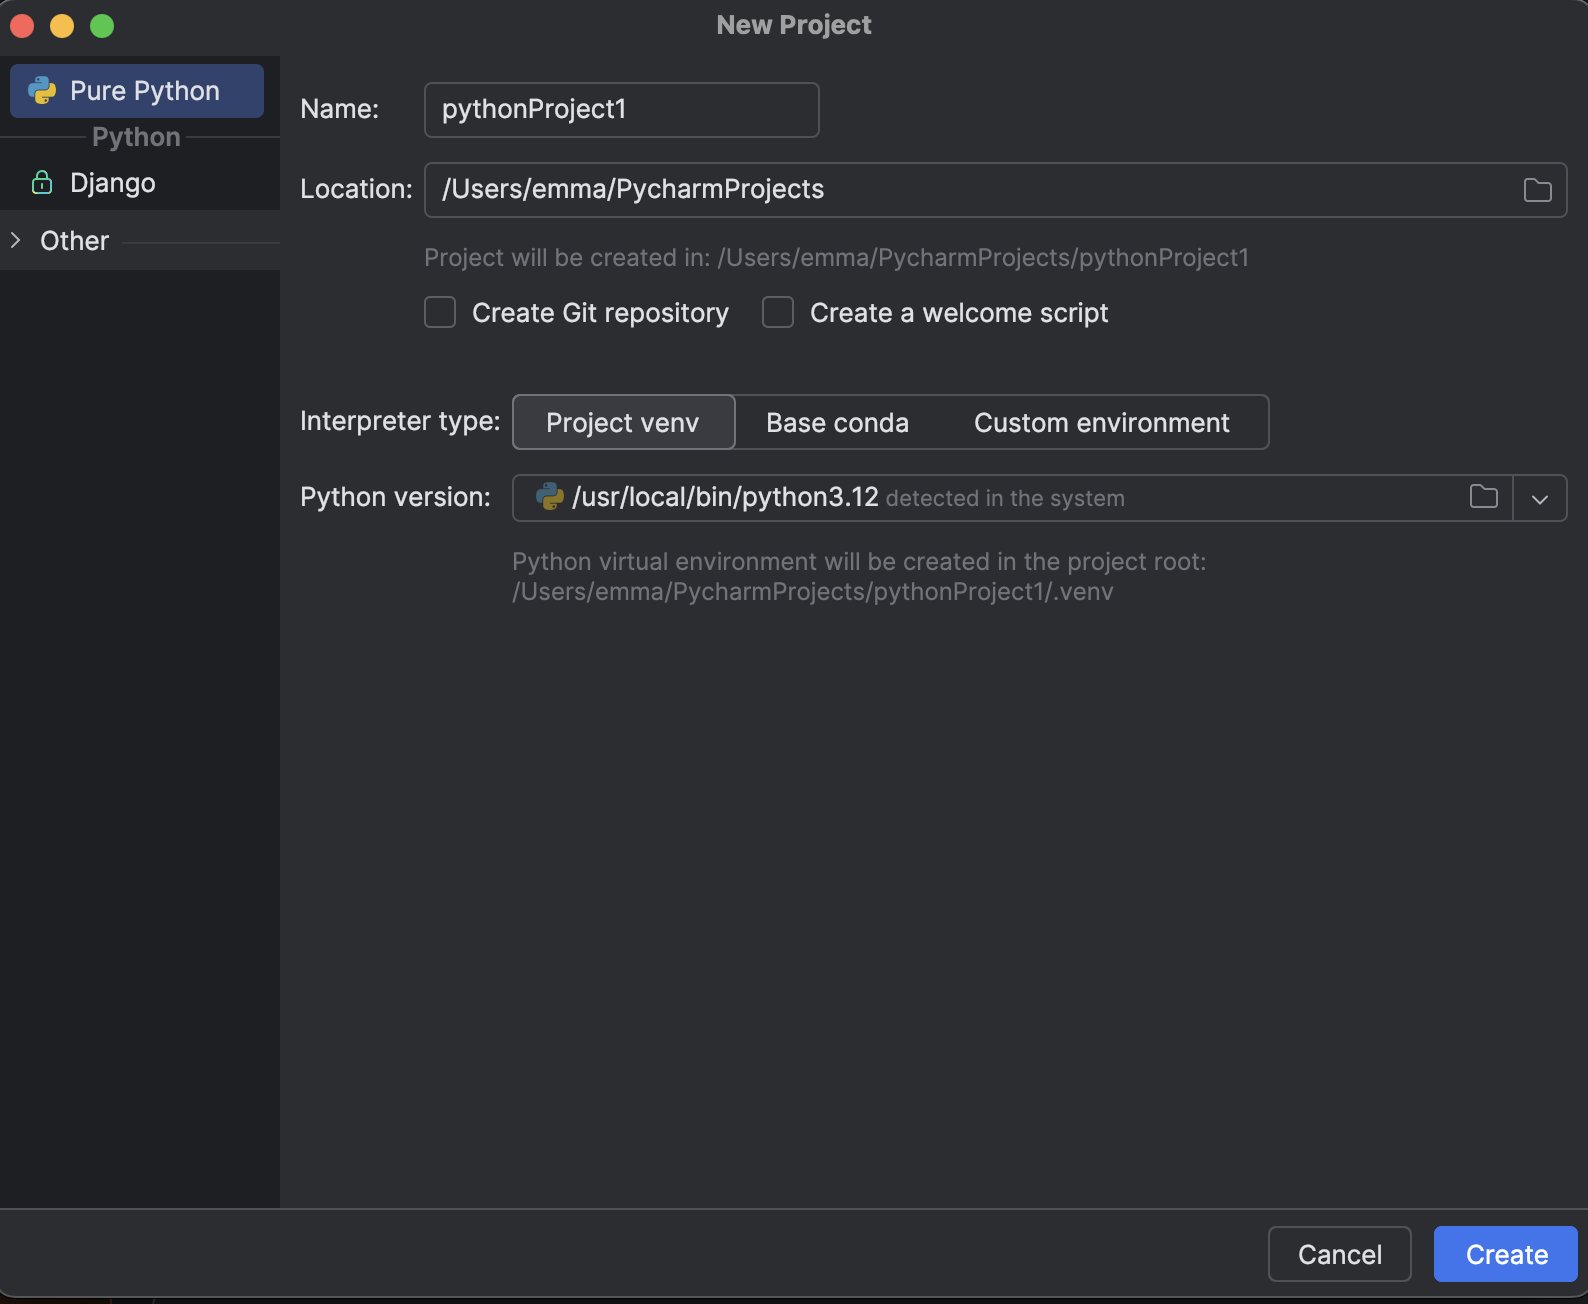
Here we will keep the settings as is, if you want you can select to create a Git Repository, more information on that can be found here. Now all left to do is click Create and install the next PyCharm extensions.
Robot Framework Language server
In the search bar on the top right, you can type in plugins, opening the plugins result will allow you to search for specific plugins. In this case, we would want to download the Robot Framework Language server.
7. Layout of Test Cases
In the previous chapter, we talked about the features of Robot Framework, what they mean and what they do. In order to write comprehensible test cases, it is important to follow a certain structure. In this chapter, we take a look at the layout of the test cases.
Test Case Structure
When looking at the test case structure of Robot FrameWork it becomes apparent that it follows the same structure for each test case. Making it easy to start each test case, once you get the flow of it and also making it readable.
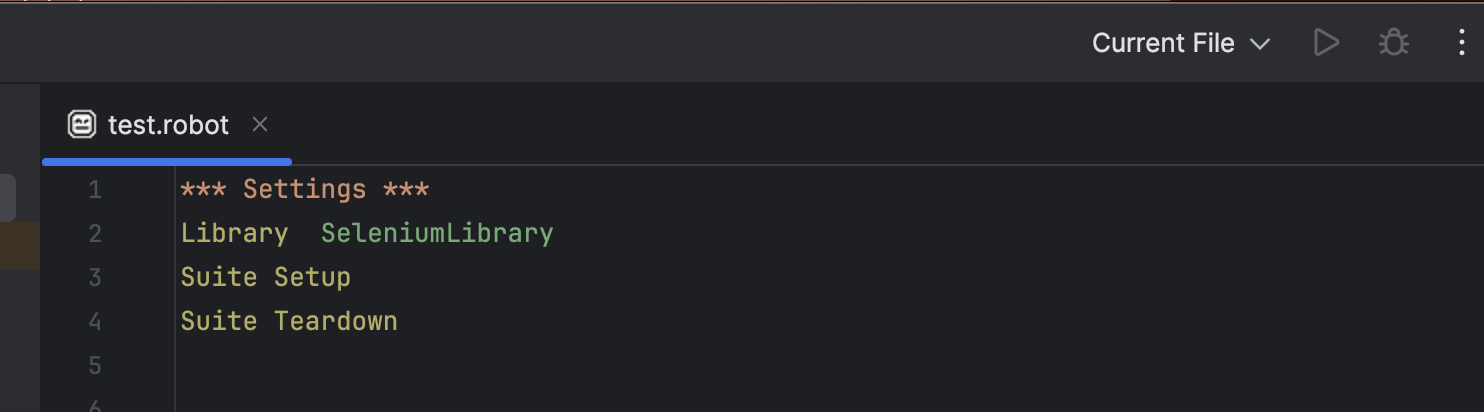
*** Settings ***
The first section of a test case is the settings, here you can specify the resources or documentation that are necessary for this test case. Most often you will find here the libraries that are used and the suite setup and teardown.
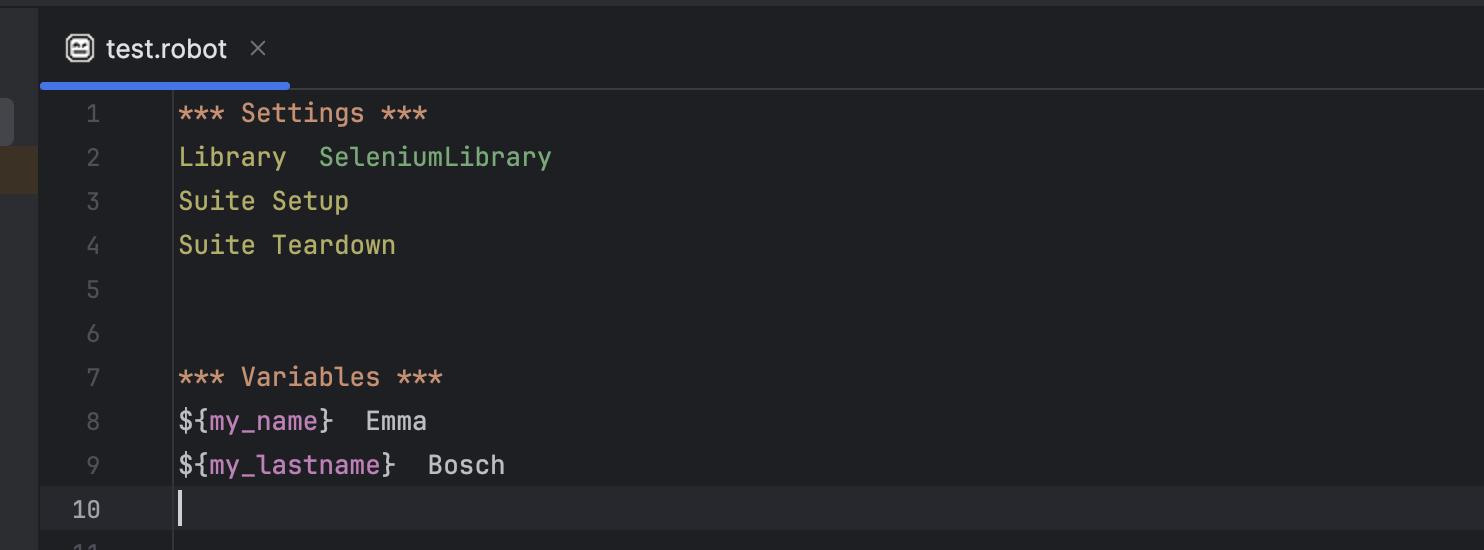
*** Variables ***
In the second section of the test case, the variables are listed, this allows you to easily change the input of an email or password, or any other type of data that can change from test case to test case. Within the robot framework, you can set a test variable, global variable, or suite variable. The difference between these variables is that a test variable is only available in the test case that you are creating, a suite variable is only available in the test suite that you created and a global variable is available in all test suites and test cases. There are different types of variables that can be created within Robot Framework, one simple example is the scalar variable which can be recognized by the ($) sign before the curly braces {}. In general, variables can be recognized by a variable type identifier ($,@,&,%) before the curly braces {} and a variable name e.g. my_var. In this guide we will not go into full detail about all the types of variables, more information on this can be found on the official website of the robot framework.
*** Keywords ***
As explained before, the Robot framework allows you to create your own keywords, these keywords are considered high-level keywords as they combine existing keywords together. Remember that in settings you imported the SeleniumLibrary? This library consists of low-level keywords. When looking at creating a simple user keyword we can think of the following example.
Open Webpage
This user keyword could exist of two existing keywords for example: Open BrowserTitle Should BeNext to the existing keyword, there should be some type of argument.
- Next to Open Browser, we can paste the link to the page that we want Robot Framework to open.
- Next to Title Should Be we would copy the title of that page in order to make sure Robot Framework verifies the correct page has opened.

Keep in mind that if you create your own user keyword in your test case file it can only be used in that specific file. It can therefore be practical to create a resource file with your own user keywords that you often have to use. You can then list the file as a resource in your *** Settings *** section. By creating your own keywords you can create more concise and readable test cases.
*** Testcases ***
Now we finally reached the part where we can start to write our own test cases. These test cases can be written with the help of simple keywords, user keywords, and arguments. In this case, we will show you a simple example of what a test case could look like. We first start with a name for our test case which should be concise and simple, in this case, we will call it: the opening contact page. Then we need to decide which steps Robot Framework has to take to go to the contact page.
- Opening the webpage of spriteCloud
- Clicking on the button on the contact page
- Verifying it is on the contact page
I wanted Robot Framework to open the spriteCloud webpage in Chrome, therefore I first created two variables, namely: URL and Web Browser. In these variables I put the corresponding arguments namely; the website of spriteCloud and Chrome. I then created a user keyword in order to open the correct browser and website. After that, I wrote my first test case using my own user keyword and keywords from the already existing Selenium library.

After selecting certain keywords from the Selenium Library you have to put in arguments to make sure Robot Frameworks either finds the correct locator or the correct text that is visible on the page.Keywords can be used with different locators or even can be used to provide text that is available on the website. Extensive information on how to use keywords and locators can be found here.
Do’s and Don'ts
When it comes to writing test cases in Robot Framework it is important to make sure the test cases are easy to understand and easy to maintain.
Do’s:
- Make sure your test case is easy to understand
- Make sure that the test case is easy to maintain
- Ensure there is an appropriate abstraction level
Don’ts
- Create dependencies within test cases
- Create verifications that are unrelated to the test cases
- Avoid using documentation within test cases
When you just start with Robot Framework one of the most important and exciting things is to see that your test case runs and passes the steps. When progressing with Robot Framework, you may notice that you are using certain test steps repeatedly in different test cases. In this case, it is important to create your own user keywords with their own source file, this way you will keep your test case abstract and avoid lengthy test cases. Just keep in mind that it takes some time.
Using Setup and Teardown
Test set up and test tear down will run for every test case whereas test suite set up and test suite teardown will run once for all the test cases. If for all the test cases you need your website to be open you could use a Suit setup to open your website in the browser that you prefer and Suit tear down to close the browser.

8. Documentation and Sources
Official Documentation
The majority of information about Robot Framework can be found on their own website, where plenty of resources are given. You will find their links to communities either on Slack, Facebook, or LinkedIn. Aside from an active community and support groups, there are also a lot of online courses available. These courses will help you step by step creating your own test cases and go into more detail.
Useful Resources
We recommend you check out the official website of Robot Framework and check out available courses on Udemy.
9. Integration With Tools
Continuous Integration (CI) Tools and Version Control Systems
Robot Framework integrates with a wide range of CI/CD tools including Jenkins, GitLab CI/CD, CircleCI, Travis CI, Azure DevOps, and GitHub Actions. Each platform can be configured to run Robot Framework tests, ensuring automated test execution and continuous integration. This flexibility makes Robot Framework suitable for diverse development and deployment environments.
Jenkins
Robot Framework can be easily integrated with Jenkins, a widely used CI/CD tool. Using the Robot Framework Plugin for Jenkins, you can generate and publish test reports and logs. Jenkins allows scheduling test runs, triggering tests based on code changes, and integrating with other tools in the CI/CD pipeline.
GitLab CI/CD
With GitLab CI/CD, you can define your Robot Framework test execution in the .gitlab-ci.yml file. This integration supports parallel test execution, custom pipelines, and Docker-based test environments. GitLab's strong integration with Git repositories makes it ideal for managing test cases alongside your code.
CircleCI
CircleCI allows for easy configuration of Robot Framework tests through its .circleci/config.yml file. CircleCI's robust caching mechanisms and support for various environments ensure efficient test execution. You can also utilize CircleCI orbs to simplify the setup and integration of Robot Framework in your CI/CD pipelines.
Travis CI
Travis CI, known for its simplicity and ease of use, supports Robot Framework tests through configuration in the .travis.yml file. Travis CI offers strong integration with GitHub, making it an excellent choice for open-source projects. It also provides a range of environments for running your tests, including Linux, macOS, and Windows.
Azure DevOps
Azure DevOps provides a comprehensive set of tools for CI/CD, and it supports Robot Framework through pipelines defined in YAML. You can integrate test results with Azure DevOps' reporting and analytics tools, enabling detailed insights and tracking of test execution over time. Azure DevOps' integration with other Microsoft tools can enhance your development workflow.
GitHub Actions
GitHub Actions allows you to automate Robot Framework tests directly within your GitHub repositories. By defining workflows in YAML files, you can trigger tests on various events like pull requests, commits, and releases. GitHub Actions provides extensive customization and integration capabilities, making it easy to tailor the CI/CD process to your specific needs.
What are the Benefits of using such tools?
- Automated Testing: Automated test execution ensures that any code changes are validated against existing test cases, reducing the risk of introducing bugs.
- Continuous Integration: Integrating Robot Framework with CI/CD tools allows for seamless continuous integration, ensuring that code changes are continuously tested and validated.
- Scalability: These integrations support parallel test execution, enabling the handling of large test suites efficiently.
- Flexibility: The wide range of supported CI/CD tools ensures that Robot Framework can be used in various environments and with different workflows.
Use Cases
- Regression Testing: Automatically run regression tests whenever there are changes in the codebase to ensure existing functionalities are not broken.
- Acceptance Testing: Validating new features and functionalities through acceptance tests before they are merged into the main branch.
- Performance Testing: Running performance tests as part of the CI/CD pipeline to monitor and improve the application's performance over time.
By leveraging the capabilities of these CI/CD tools, Robot Framework ensures a robust and efficient testing process, enhancing the overall quality and reliability of your software.
IDE Support
Robot framework provides official support for several Integrated Development Environments (IDEs) through various plugins and extensions. Here are some of the most popular ones:
PyCharm
JetBrains provides a plugin called "Robot Framework Support" for PyCharm, which adds support for Robot Framework syntax highlighting, code completion, and other features.
IntelliJ
Similar to PyCharm, IntelliJ IDEA also supports Robot Framework through the "Robot Framework Support" plugin.
VSCode
There is an official extension called "Robot Framework Language Server" available for VS Code. This extension provides features like syntax highlighting, code completion, and linting for Robot Framework test files.
Eclipse The RED (Robot Editor) plugin for Eclipse offers comprehensive support for Robot Framework, including syntax highlighting, code completion, and debugging.
10. Final Thoughts
Overall, Robot Framework is easy to set up and quite easy to understand if you follow the basic guidelines. However, there can be a bit of a learning curve if you wish to implement complex custom test cases. It can take some time to perfect your test cases and to make them as readable as possible, but once you get the hang of it it is an easy tool to use. Just make sure that before you start installing Robot Framework, this is in fact the automation framework that is fit for your testing purposes!
Ready to unlock the true potential of Robot FrameWork?